
CommandIQ Setup
The first time you open CommandIQ, you will be prompted to enter some information to allow CommandIQ to manage the COLTONTEL router. This information includes establishing your user login credentials for management, identifying the router to manage, and setting up the Wi-FI SSID and password. This is a one-time setup activity to be completed only at initial launch.
The CommandIQ setup process assumes that the COLTONTEL router has been installed and connected to the internet.
If your COLTONTEL router is not already connected to the internet, complete the three easy steps below to set up the router with internet connectivity before continuing.
To set up a COLTONTEL router with an internet connection
Before getting started, locate your existing internet service outlet (NETWORK jack). Typically you will locate the COLTONTEL router close to this device, unless you have a longer Ethernet cable.
- Connect an Ethernet cable between the COLTONTEL router and the NETWORK jack.
- Connect one end of the cable from the wall of the NETWORK jack to the WAN port on the COLTONTEL router.
- Connect the other end of the cable to the LAN port on the modem or ONT.
- Plug the router into a power outlet.
- Allow several minutes for the router to boot-up. When successfully completed, the LED light bar on the router will be illuminated solid blue, indicating that the internet connection has been established.
Continue to the following topics for instructions to complete initial router management setup with CommandIQ.
Quick Guide is available here, Or the Full Product Guide.
Step 1: Launch and User Setup
The first time you open CommandIQ, you will be prompted to complete an initial setup to manage the COLTONTEL router, starting with setting yourself up as an authorized CommandIQ user by establishing a personal login ID and password. This is a one-time activity only.
Open the CommandIQ app on your mobile device to get started.
To launch CommandIQ and set up your user account
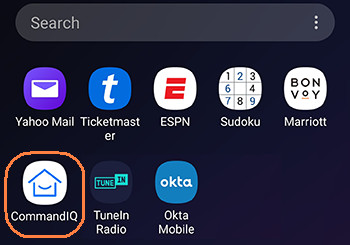 |
On your mobile device’s app launcher screen, tap the CommandIQ app icon to open the app. |
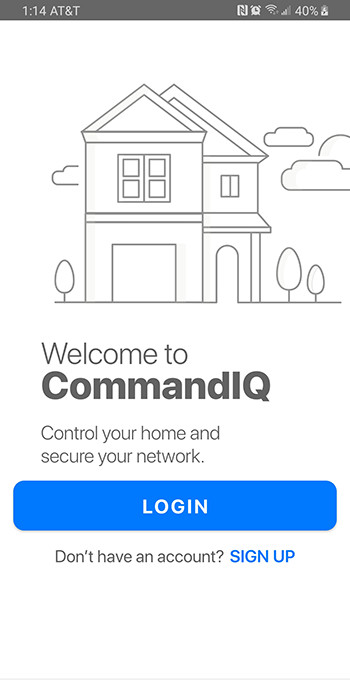 |
On the CommandIQ launch screen, tap Sign Up to set up your user account. Note: If you have already established a user account and set up the router, go to the login.
|
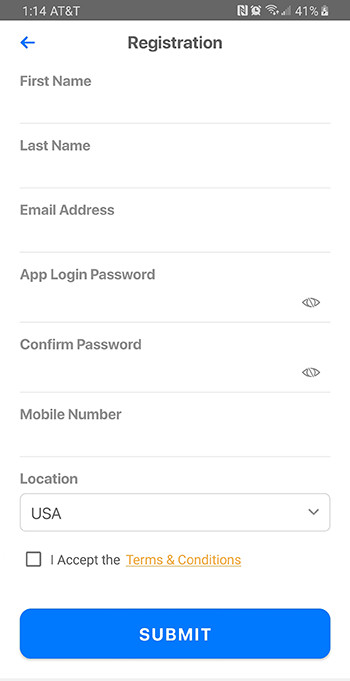 |
On the Registration screen, tap each field and type to input the following information: First Name: Your first name Last Name: Your last name Email Address: Your email address, which serves as your app login username App Login Password: Create a password to log in to the app on this device Note: The password must be at least 8 characters in length. Tap the eyeball icon to see the characters as you type. Confirm Password: Re-type the password to ensure fidelity (that it matches, no typos) Mobile Number: Your mobile phone number In the Location field, tap and scroll to select a country from the list, or accept the default (USA). Tap to select the checkbox for the “I Accept the Terms & Conditions” acknowledgment (required to proceed). Tap the Submit button to save your inputs and continue.
|
Step 2: Add Router
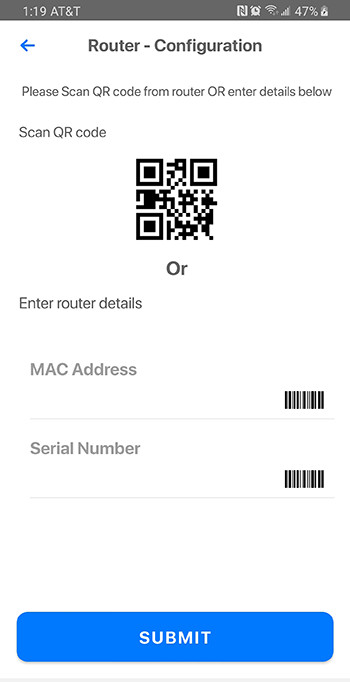
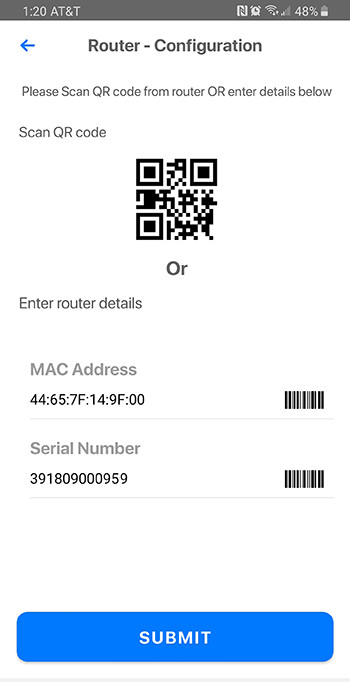
The next screens in the setup sequence collects unique manufacturing information about the COLTONTEL router that will be managed by the CommandIQ app, so that the router can be identified by cloud services. The unique identifiers collected by CommandIQ are its serial number and MAC address, which can be found printed on the product label on the bottom of the router.
You can collect this information conveniently and error-free by using the QR-code scanning function via your mobile device’s camera. Or as an alternative, you can input the information manually by typing into the respective fields.
To add the COLTONTEL router’s information into CommandIQ
 |
|
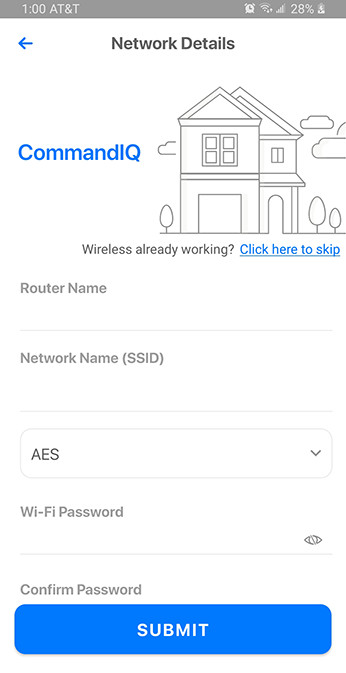
Step 3: Configure the Wi-Fi Network
The next screen in the setup sequence helps you set up your home’s primary Wi-Fi network, including assigning a name to your COLTONTEL router (the name that appears in the CommandIQ app).
Note: If you have already set up a primary Wi-Fi network, such as from the router’s embedded web interface before using CommandIQ, you can skip this step by tapping the “Click here to skip” link on the Network Details screen. You can modify the router name later from the Network Map screen.
To configure the COLTONTEL router’s Wi-Fi network
 |
After completing the steps above, the router setup is complete for essential settings and you are taken to the CommandIQ main dashboard (home screen).
|
Using the CommandIQ App
After the initial setup is completed, use CommandIQ to manage the COLTONTEL router and your home’s Wi-Fi experience from the convenience of your mobile device.
As long as you remain signed in, each time you open the app after initial setup, you are presented the CommandIQ dashboard (home screen). From the dashboard, you can quickly access all of the CommandIQ app functions to manage your home network.
Your COLTONTEL router is the central hub that connects all devices in your home to the internet, and CommandIQ allows you to control the COLTONTEL router and all connected devices conveniently from the palm of your hand. Check out the topics in this section to better understand how to use CommandIQ.
CommandIQ dashboard
Note: If your COLTONTEL router is equipped with premium software applications offered by your internet service provider (called IQ suite apps), these apps’ features can be managed from CommandIQ. If present, these premium IQ apps will appear on the CommandIQ main menu. Refer to the section below Using Premium Features (IQ Suites) for usage guidance
.
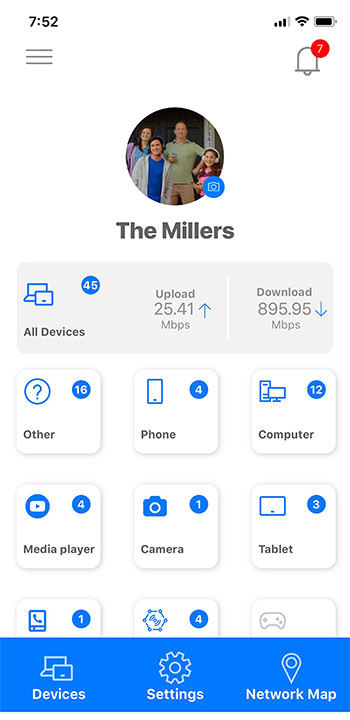
Dashboard (Home Screen)
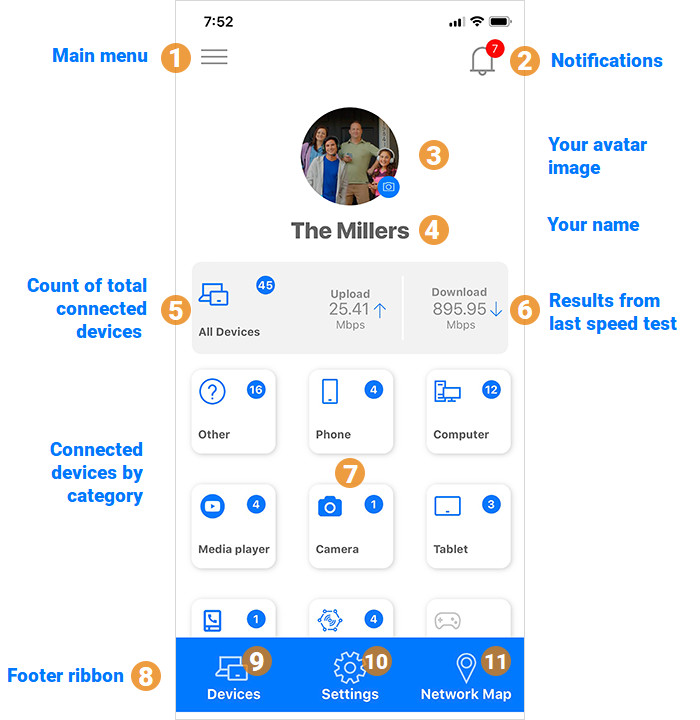
The home screen for CommandIQ is called the dashboard. The CommandIQ dashboard provides quick access to all of the app’s functions and ties them together in a convenient single screen.
Check out the dashboard’s element map below to familiarize yourself with the element names. See the linked Help topics for detailed instructions on how use each feature.
|
|
|
Using Premium Features (IQ Suite Apps)
COLTONTEL systems are powered by a modular operating system that supports the seamless addition of containerized software applications. What does this mean in layman’s terms?
It means that premium feature-based software apps can easily be applied to and removed from your system to enhance the quality and security of your online experience, with no reboots or reconfigurations required. These add-on software apps (called “IQ suites” in this Help document) are typically available as a premium service offered by your internet service provider.
If your service provider offers IQ suite apps and has enabled one or more of these apps on your account, you can activate the IQ suite app in CommandIQ with just a tap of the screen. Once activated on your COLTONTEL system, you can manage the app’s features in CommandIQ as described in this section.
IQ suite apps currently available for COLTONTEL systems include:
- ProtectIQ: The ProtectIQTM network security application provides additional home network security protection against malicious activity including virus and ransomware packet inspection, malicious website blocking, and intrusion detection. ProtectIQ proactively monitors network traffic coming into your home, and automatically blocks any suspicious-looking traffic and provides security alerts (where you receive mobile notifications when content is blocked). Use ProtectIQ to establish and enforce a home perimeter layer of security and privacy.
- ExperienceIQ: The ExperienceIQTM enhanced parental controls application provides an extensive set of parental control features that allow you to create and enforce policy-based internet connectivity rules for users and devices on your home network. You can use these parental control tools to limit users’ time online and protect your children from inappropriate or harmful content, all managed directly and conveniently from CommandIQ.
If you’re interested in using these premium features but don’t see them present on your COLTONTEL system, inquire with COLTONTEL’s Business office about adding the IQ suite apps to enhance your online experience.
This section describes how to use the premium features enabled with the IQ suite apps.
ProtectIQ: Network Security
The ProtectIQ network security app for COLTONTEL systems provides built-in malware and virus protection for your network. ProtectIQ provides several security features to protect your home network from cyber threats, including:
- Anti-virus & anti-malware module: For anti-virus protection, ProtectIQ scans file attachments and file downloads for virus signatures. The Web Guard service scans web content for malware.
- Signature updates: This intrusion detection and protection service detects issues with digitally signed firmware.
- Alerts & notifications: ProtectIQ generates and delivers real-time system alerts when threats are detected and blocked.
- Event Logs: ProtectIQ generates and stores threat activity logs that can be used by your service provider to proactively address potential threats.
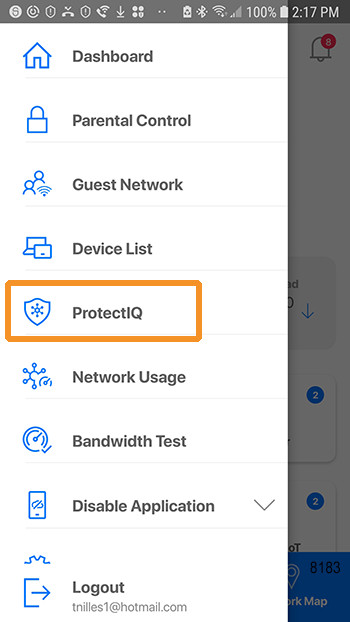
If present, tap ProtectIQ from the main menu to begin.
To view ProtectIQ alerts and manage settings
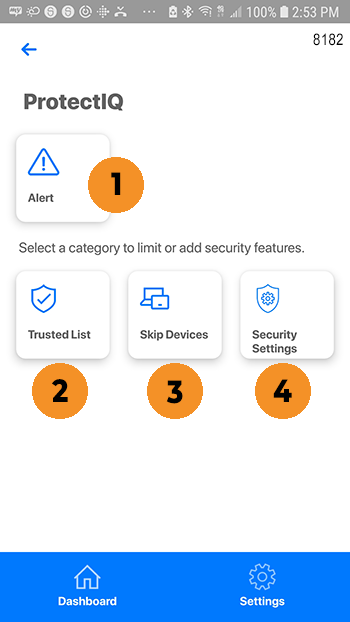 |
See the following topics for details about using each option.
|
ExperienceIQ: Enhanced Parental Controls
The ExperienceIQ enhanced parental controls app for COLTONTEL systems provides an extensive set of parental control features that allow you to create and enforce policy-based internet connectivity rules for users and devices on your home network. You can use these parental control tools to limit users’ time online and protect your children from inappropriate or harmful content, all managed directly and conveniently from CommandIQ.
Note: The ExperienceIQ premium service replaces the basic parental controls feature that comes standard with the CommandIQ app, and is found at the same location as the standard feature (Main menu > Parental Control). Once activated, the ExperienceIQ service clears any existing parental control profiles that may be present if created in the basic service. You must create new control profiles and rules in the ExperienceIQ Parental Control screens.
ExperienceIQ enhanced parental controls allow you to manage user connectivity via rules and profiles:
- Set-up of user profiles
- Assign discovered devices to a parental control profile
- Configure Time of Use rules
- Configure content filters rules
- Provide violation notices of rules that are broken (or attempted to be broken)
- Usage reports for all parental control profiles.
Parental Controls support three types of filtering:
- Content (kf – keyword filter)
- Application (apg – application guard)
- Website (uf – url filter)
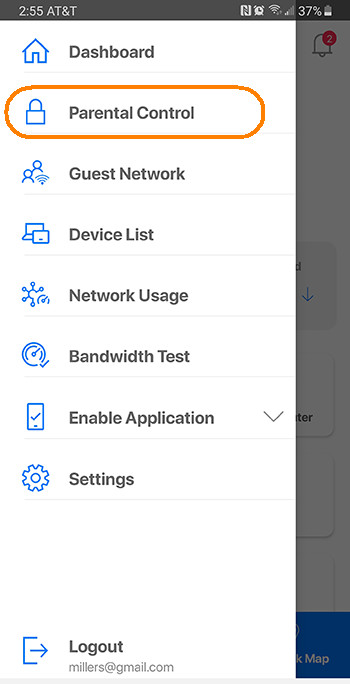
Tap Parental Control from the main menu to begin.
To set up parental controls
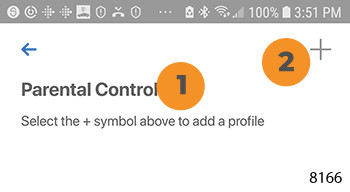 |
The Parental Controls feature provides the ability to set profiles and assign devices for basic on-off control such as dinner or bed time. To add a profile 1. From CommandIQs dashboard, tap Parental Controls. 2. Tap the + symbol to create a new profile
|
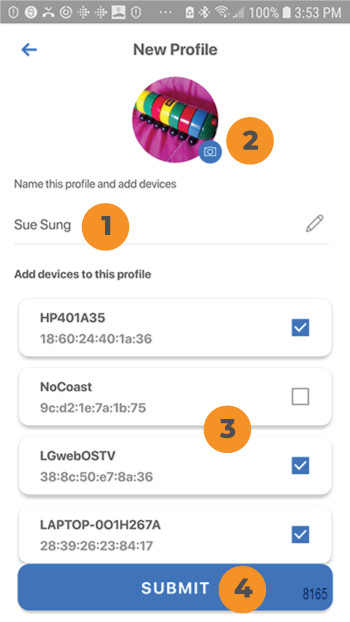 |
To Create a New Profile 1. Enter the name for the child profile 2. Optional: Add a picture if desired in the box presented. 3. Tap on the devices on your network that you like to add to this profile. 4. Once you’ve selected all the devices, tap SUBMIT located at the bottom of the screen.
|
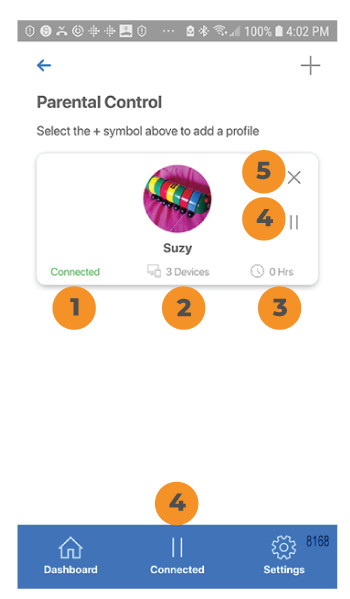 |
You can customize each profile by using the pencil icon to edit the profile and the camera icon to edit the picture if desired. Parental Controls Dashboard All user profiles are available for editing and viewing from the parental controls dashboard. 1. The profile indicates it is currently connected. Select the play icon to turn access back on. 2. At any time you can add or or remove devices by selecting “remove” beside each device. Select the + symbol to add a device. One thing to keep in mind – you should not add the device with this application to a profile . In doing so, it’s possible to inadvertently cut off your own access to these controls. Should this occur, switch to mobile data to restart the profile with your app device. To remove access simply select the pause icon to disable all devices connected to this profile. +++++++++++++++++++++++++++++ Customize each profile by using the pencil icon to edit the profile and the camera icon to add a picture if desired. The profile indicates it is currently connected. To remove access simply select the pause icon to disable all devices connected to this profile Select the play icon to turn access back on. At any time you can add or or remove devices by selecting remove beside each device. Select the + symbol to add a device. One thing to keep in mind – you should not add the device with this application to a profile . In doing so, it’s possible to inadvertently cut off your own access to these controls. Should this occur, switch to mobile data to restart the profile with your app device.
|